Sebastopol Living Peace Wall
Sebastopol Living Peace Wall
Honoring those who have worked nonviolently for peace and justice

After two and a half years of planning, drawings, full scale models, 1/3 scale models, city council and planning commission meetings, art commission meetings, more city council meetings, engineering, granite fabrication, peace symbol modeling and casting in bronze, the building of concrete forms and the pouring of the pedestal and the installation of the completed components, the Living Peace Wall is now a reality in downtown Sebastopol! I thought it might be interesting to share some photos of the building of the wall.
Michael Gillotti
CREATING THE PEACE SYMBOL
CREATING THE PEACE SYMBOL
The Living Peace Wall is constructed of six inch thick solid granite panels and a custom designed bronze peace symbol cast at the Bronze Plus Foundry in downtown Sebastopol. The pedestal is made of colored, reinforced concrete. It stands six feet tall in the center, and tapers to two feet left and right. The width is twelve feet.

I start the process of making the model for the peace symbol. I choose 3/16" form core for the front and back faces and corrugated cardboard for the walls. Each corrugated piece of cardboard had to be meticulously scored between the corrugations so it would bend without creasing.
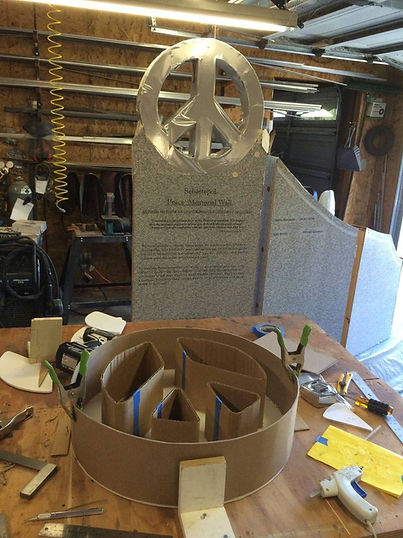
The inside and outside walls are hot melt glued to the bottom, foam core face.
Note the full scale plywood model of the peace symbol and granite panels in the background.

The completed peace symbol model. I spent days on this to get it
as precise as possible, knowing that whatever I submitted to the
foundry is exactly what I would get back in cast bronze.

At the Bronze Plus Foundry, near downtown Sebastopol, they prepared my model with wax channels through which the hot melted bronze would flow. Since it would be difficult for the liquified bronze to fill in all the different walls and face plates, part of the outside wall was removed and cast separately, then welded back on later.

The next step in creating the mold was to dip the model into a liquid ceramic solution and sand several times to form an outer coating. This was then fired in a kiln at approximately 2000 degrees. In the process of firing the ceramic mold, the foam core and cardboard model as well as the wax channels are burned up. The remaining ashes are blown out, leaving a hollow ceramic mold.

Bronze "bricks" waiting to be melted down to liquid and poured, or cast into the ceramic molds.

The bronze is cast by heating the bronze "bricks" to near 2000 degrees or until it's liquified. Matt Hart and Jim Pollare remove the super hot pot from the kiln and maneuver it to the ceramic molds.

The bronze is carefully poured into the molds. The next day, after the bronze has cooled and set, the ceramic mold is broken off with a hammer and the bronze peace symbol emerges.

After polishing and wax sealing to reduce weathering, Jim does some finishing touches before I deliver it to the monument maker so he can fit it into the center granite panel.
To add some interest and to subtly introduce my favorite color, I had Matt add a blue patina to the inside walls.
CREATING THE GRANITE PANELS
CREATING THE GRANITE PANELS

6" solid Granite panels being cut with a diamond tipped blade at Wheeler-Zamaroni Quarry in Santa Rosa.
Because I had built a full size model of the wall out of plywood, I was able to create cardboard templates of each panel. These templates were then used to cut the exact size and shape of the actual granite.

An automated polisher set to work on one of the granite panels. After this step, the panels were then polished and finished by hand.

A wing panel ready for hand polishing and finishing after being cut to shape.

Center panel cut to shape. Note the "cradle" cut out at the top to accept the peace symbol.

Granite panels set up at North Bay Monument.
Here all the mounting holes and horizontal
rod holes were drilled, the inscriptions and borders were engraved, and the peace symbol was fitted.

Center panel with stencil in place ready to be engraved. Note the holes on the side. These are for installing the horizontal bronze rods that link the panels together.

The bench was not part of the original design, but since we had access to the granite and had the space at the site, we decided to include it. It also gives people a place to sit and meditate on peace.
CREATING THE PEDESTAL / FOUNDATION
CREATING THE PEDESTAL / FOUNDATION

Steve Green convinced me to build the form in my garage rather than on site so that it would be as level and perfect as possible. This turned out to be a good decision, since it was a complex form with three different radii.

Building the forms turned out to be one of the more challenging parts of the project. We first had to build templates for the top and bottom plates, as well as the front plywood wall, which not only had a different radius but also sloped outward. I wanted the slope so that the lettering would be more readable and so that there would be movement from the ground up through the granite panels. This is the front and back wall upside down.

I knew I wanted the lettering to be embedded into the concrete but had no idea how to do it. Steve mentioned that he had once used styrofoam but didn't know where to buy the letters, so I printed out the letters and traced them on 1/2" foam core. Then I cut each one out with my scroll saw.

We were both very concerned about the letters getting knocked off or damaged during the concrete pour. I ended up crawling inside the the finished form and both gluing and nailing the letters on the inside of the form. I had to think upside down and inside out in order for them to be readable once the forms were removed. I finished this around 2 a.m. the night before the concrete pour.

After completing the form, we loaded it onto Eric's truck to transport it to the site. It was quite heavy but four of us were able to lift it without hurting ourselves, or the form.

The concrete team, without Steve Green. We were literally down in the trenches.

Can you dig it? Since the city wasn't certain about what was under the ground, we decided to dig it by hand rather than with a backhoe. This way if we'd be less likely to do any serious damage to whatever might be down there.

Steve and I spent the good part of a day bending and cutting and pre assembling the rebar. After final assembly at the site, we positioned the rebar in the trench, and then lifted the form over the top of it.

Richard, Steve and Saul leveling the form, while Eric supervises them.

After weeks of planning and building and some anxious nights in bed worrying if the forms would hold during the pour, the concrete pumping begins. No turning back now. Steve and I both felt it was better to over build the form rather than under build it. Still, it was such a unique situation it was hard to predict for sure how it would hold up.

Richard and Michael placing "personal prayers for peace" into the
foundation/pedestal form.

Personal Prayers for peace about to be embedded into the foundation / pedestal forming a metaphorical foundation for peace. When the concrete truck driver and the pumper discovered what we were doing, they wanted to fill out a personal prayer of their own and placed them into the concrete. It took me by surprise and we were all delighted that they participated.

Eric and Steve troweling off the top. I was concerned that the concrete coloring I choose was too dark. However, when it dried it lightened up perfectly.

The forms are removed and we're all happy. Steve Green, Richard Retecki and me, Michael Gillotti. Note that the white foam core letters are stuck in the concrete. They were easily removed with a chisel, also shown in the photo.

The finished foundation / pedestal. We all held our breath the next day when we pulled off the forms. Would the letters come out clearly or were they knocked around during the pour. Fortunately, it all came out beautifully.

A couple days after the concrete pour these Buddhist monks just happen to be walking by. After I explained that this was the foundation / pedestal for a Living Peace Wall, they offered to perform a blessing ritual.
INSTALLING THE GRANITE PANELS, PEACE SYMBOL & BENCH
INSTALLING THE GRANITE PANELS, PEACE SYMBOL & BENCH

Installation of granite panels and cast bronze peace symbol begins October 6, 2015. Gary Galeazzi, Brian and Mike from North Bay Monument.

Center panel is lowered onto the pedestal.

First, the center panel had to be positioned in the center of the pedestal and epoxied. Then we set the wing panels one at a time to the right and left.

Gary installing the horizontal solid bronze rods before moving on to the first wing panel. He had to use slow drying epoxy so that the bronze rods could be pulled out and attached to the adjacent panel before it set up.

Left wing panel moved into position. This panel weighed over 600 lbs., but somehow Gary and Mike were able to lift it into place! Amazing!

Gary and crew have been doing this kind of thing for years, so had the system down. They always put spacers between the granite and the concrete pedestal. This allows for movement over time and prevents cracking.
Note the bench to the right. It follows the same arc or radius as the wall.
The inscription on the seat of the bench reads:
"Peace Begins With Me".

Peace is descending from above!

The final, crowning moment. All I could think of was, please don't drop it!

Peace has found its home.

The finished product!!

The back side of the peace wall facing the town plaza.
We aligned the peace wall with
the other peace sculpture across the street where the word
" peace" in carved into limestone blocks in thirty different languages. I like to think of them as communicating with each other and creating a "peace zone" between themselves.

My hope and prayer is that the Living Peace Wall will serve to remind us that peace begins with each of us. If we can learn to connect to that inner peace that resides within each of us, we can then take this peace out into the world and help create a more loving, kind and peaceful world.
Michael Gillotti, 2015